
This is Part 5 of a mini-series on rubrics. Be sure to check out the other parts as well as the intro post.
Now we can have some fun. Creating a rubric is indeed hard work. Common indicators help streamline the process, but it still takes time to create and score them. But now that we have our rubric, we can use it to our advantage. Don’t just hand out the rubric, use it as a teaching tool. Here are a few strategies you can use to teach the rubric and teach using the rubric.
First we need to teach students what our rubrics actually are. It’s possible they are not used to using rubrics. Part of the reason I recommend rubrics not spanning more than one page is so that they are more digestible for students. You don’t want to overwhelm students with voluminous text, particularly early on.
Have students create examples
So start by reviewing the rubric with students. Ask for their interpretation of the indicators: “What does it mean when the rubric says ‘___’? Give me an example of what that would look like.” For common outcomes and indicators, which we are going to be using all year, you may even wish to devote class time to creating examples for each column. Let’s take our rubric row from our SMP Rubric, SMP 6:
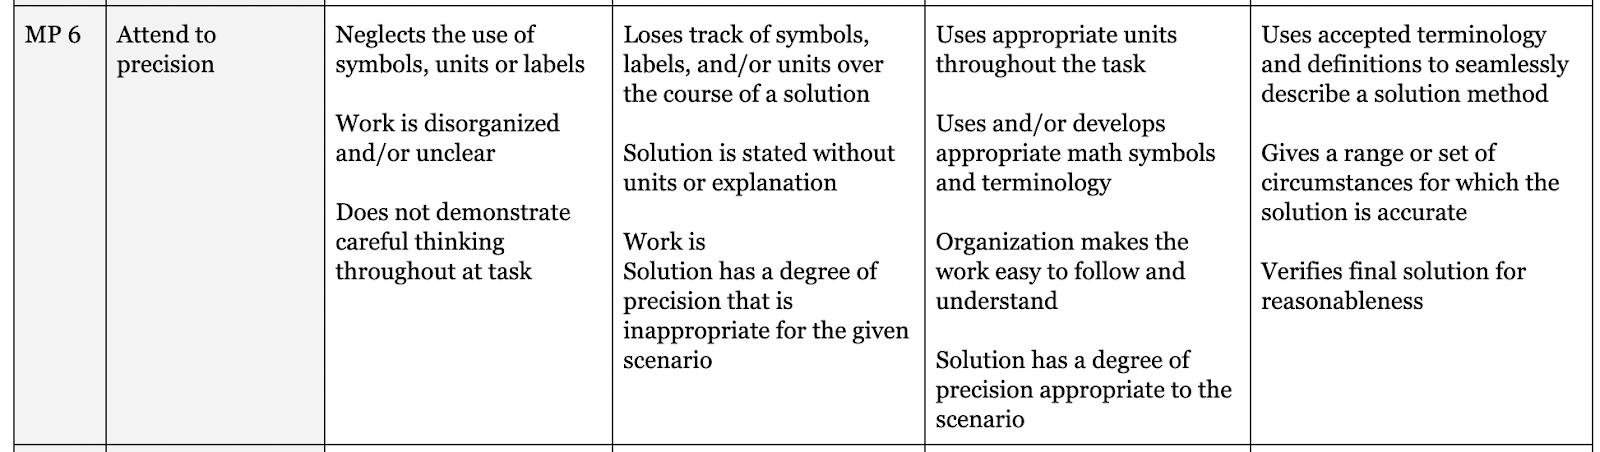
You or your students can create examples of, for instance, a piece of work that “loses track of symbols.” You can ask students to do this: yes, they would be intentionally screwing up their work samples! It’s fun! Or you can give them an exemplary piece of student work (entirely within the Advanced column) and ask students to recreate the work into descending proficiency categories:
Group 1: Recreate this student work so it fits mostly in the Proficient category.
Group 2: Recreate this work so it fits mostly in the Developing category.
Group 3: You get to have some fun – recreate this work so it’s in the Emerging category.
This way students are interacting with the rubric, the outcomes, and the indicators. Once you’re done, you can post them on the wall so they can be examples of varying levels of quality work.
Employ Self-Assessment
A strategy I often use is fairly straightforward: engage students in self-assessment on the rubric before turning in their work. When students are working in groups, I call together one individual from each group. I ask them to bring their work, such as it is. I have for them printed out copies of the rubric (one page, remember). And ask them to spend a few minutes identifying where their work currently lands on the rubric. I ask students to share with our little convening what they could do to improve their work. They can even draw inspiration from one another if they want.
These strategies stem from a couple core principles when it comes to rubric pedagogy:
- Make sure you provide the rubric to students with intentionality; don’t just give it to them and expect them to know and understand it. Review it with them.
- Use rubrics as a tool to engage in metacognition, particularly where students are reviewing their own work and the work of others.
In the next, final post of this mini-series, we’ll get into another core principle when it comes to using a rubric: scoring with humility.
Be sure to subscribe to Emergent Math if you’d like to receive every new post in your inbox. If you’re new here, you can check out my featured posts page or other mini-series (Routines, Lessons, Problems, and Projects & Your Math Syllabus Boot Camp).
Additional posts in this mini-series:
Intro: A Rubric Masterclass
Part 1: Selecting Rubric Worthy Tasks
Part 2: Establishing Common and Specific Outcomes
Part 3: Defining Proficiency and Moving Outward
Part 4: Scores, scoring, grades, and grading
Part 5: Teaching with a rubric; teaching the rubric
Part 6: Humility in Grading
